As an advanced and well-known operating system, Windows 10 has millions of users worldwide. Owing to its proper function, more and more users would like to update their Windows system to Windows 10.
However, Microsoft has changed the way of the latest update in May 2019. It will demand you to remove all external USB drives or SD cards before starting the setup. If you are trying to upgrade the system to Windows 10 version 1903, you may come across this error “this PC can’t be upgraded to Windows 10”.
When this error takes place, it means that there is something wrong with a certain hardware, driver or service. Don’t worry. In this post, I’ll share several useful methods to help you how to finish Windows 10 upgrade successfully.
What to Do When System Can’t Be Upgraded to Windows 10
Fix 1: Remove All External Devices
If some external devices are connecting to your computer when the upgrade is ongoing, the error “this PC can’t be upgraded to Windows 10” may come into sight. So, if this is your case, don’t hesitate to remove all disconnecting external media, including USB drive & hard drive, SD card and printer. Then, restart computer and retry upgrading system to Windows 10.
However, what if you are upgrading to Windows 10 by using a USB drive containing the installation media? In this circumstance, you need to copy the installation media to local drive and unplug the USB drive. Then, get down to restarting the installation from the local drive.
Fix 2: Run Update Troubleshooter
Running Windows update troubleshooter is another way to solve the issue of Windows failing to upgrade to Windows 10 or Windows 10 version 1903. As Windows update troubleshooter is a built-in utility, you can make it easily within several steps.
Step 1: Enter Settings by pressing Windows + I buttons.
Step 2: Choose Update & Security category > click Troubleshoot section > Windows Update > click Run the troubleshooter.

This utility can help you solve Windows update issues by detecting related problems. So, it is a useful tool to deal with system upgrade issues.
Fix 3: Check and Update Graphics Drivers
If the graphics driver is outdated, you may fail to upgrade system to Windows 10. When this error appears, you need to check if the installed graphics card is out of date. Then, update it to the latest version. After that, try upgrading system to Windows 10.
Fix 4: Restart the BITS Service
BITS (short for Background Intelligent Transfer Service), is developed to allow computer to receive updates. If there is something is wrong with this service, you may not be able to receive any updates.
In order to solve this problem, you are suggested to restart the BITS service to and try updating to Windows 10 again.
Step 1: Get Run window by press Windows + R. Enter services.msc and then click OK to open Services app.
Step 2: Find Background Intelligent Transfer Service (BITS) service. Right click and choose Start to enable it. Choose Restart if it is running.

Step 3: Right click the Background Intelligent Transfer Service (BITS) and choose Properties > General > select Automatic in Startup type.
Step 4: Click OK and restart your computer.
After that, try updating windows 10 to see if it can be downloaded. Please go on checking next solutions if it doesn’t work.
Fix 5: Check Drivers
This error massage has indicates that it is probably caused by a certain driver or service that is not ready for the Windows 10 update. So, when you get the error massage, you can check the drivers and make sure all of them are of the latest version.
Just enter devmgmt.msc in Run window, and then click OK to get into Device Manager. Next, expand all device categories to see if there are drivers are displayed with yellow marks. If so, please choose to update or reinstall them from right-click menu one by one.
Fix 6: Free up Hard Disk Space
You need to make sure the free your computer meets the Windows 10 requirements before starting upgrading system to Windows 10. There are requirements with free disk space: 16GB for 32bit OS and 20GB for 64bit OS. If your hard disk can’t meet this demand, you will fail to upgrade system to Windows 10.
Now, you can follow these steps to clear unnecessary files to free up disk space.
Step 1: Open File Explorer and click This PC.
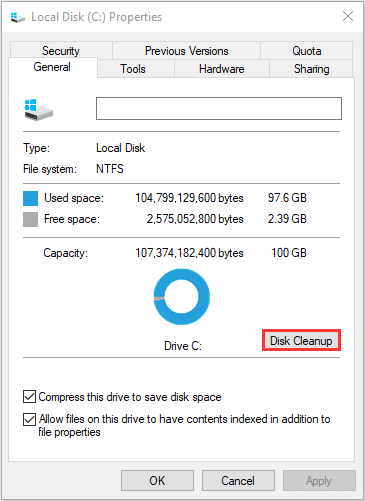
Step 2: In Devices and drives section, right click the system partition and select Properties.
Step 3: Choose General tab and click Disk Cleanup.
Step 4: Then, the tool will calculate how much space you can free up on the partition. You just need to tick on the files or folders you don’t need any more to clear. Click OK to execute.
However, disk cleanup is not enough sometimes as the free disk space of system partition still fails to meet the requirement of Windows 10. In this case, you need to enlarge the system partition. MiniTool Partition Wizard will enable you to achieve it easily.
Guide to extend partition Windows:
Step 1: Launch this free partition manager to enter the main interface.
Step 2: Right click the target and choose Extend.
Step 3: Choose another partition or unallocated space from the drop-down list. Drag the slider leftwards or rightwards to determine how much free space will be taken to add the target partition.
Step 4: Finally, click Apply to make the change effective.

Fix 7: Disable Antivirus Temporarily
Windows 10 update and installation would be interfered by the antivirus program, which causes the error this PC can’t be upgraded to Windows 10. So, you may choose to disable your antivirus apps at the moment and then continue to upgrade Windows. Both Windows built-in Defender or Firewall and third-party antivirus programs should be disabled.
Disable Windows Defender: go to Settings > Update & Security > Windows Security > Virus & threat protection. To temporarily disable Windows Defender in Windows 10, you can go to Windows Settings > Update & Security > Windows Security > Virus & threat protection. Click Virus & threat protection settings and disable the button of Real-time protection.
Disable Firewall: go to Control Panel > System and Security > Windows Defender Firewall > Turn Windows Defender Firewall on or off. Click the option Turn off Windows Defender Firewall for both private and public network settings.
After making the antivirus programs disabled, you can upgrade to Windows 10 again to see whether the error message will appear. When the update is completed, you may re-enable the antivirus tools and Firewall to protect your computer from viruses or risks.
Bottom Line
There are 7 methods mentioned above in total to solve the error message this PC can’t be upgraded to Windows 10. If you happen to meet this problem, please choose proper ways to deal with the issue.
If you have any good solutions or questions about this topic, please share it with us in the comment section below. We would read them and give you further help.