Screen recording on an iPhone might seem straightforward, but there’s more to it than meets the eye. This article dives into the nuances of capturing your iPhone screen, providing practical tips to enhance the quality and utility of your recordings. Whether you’re a student, content creator, or just someone looking to share your screen activities, these insights will elevate your screen recording game.
What to Expect
By the end of this article, you’ll be equipped with essential techniques for effective screen recording on your iPhone. These tips will help you create clearer, more engaging, and purposeful content.
Introduction
Are you looking to capture your iPhone’s screen for a tutorial, gameplay, or maybe to record a bug for tech support? Screen recording on an iPhone is a feature that’s been around for a while, but not everyone knows how to use it effectively. You might think it’s as simple as hitting the record button, but there’s much more to it. This skill is becoming increasingly important in our digital world, where sharing information visually is often more impactful than text. From educators creating e-learning materials to gamers sharing their high scores, screen recording is a versatile tool. Understanding how to harness this functionality can make a big difference in the quality and clarity of your recordings. In this article, we’ll explore five crucial tips for how to screen record on iPhone.
Tips for Screen Recording on an iPhone
Let’s delve into the specifics of optimizing your screen recording experience on an iPhone.
Tip 1: Know How to Start and Stop Recording
This first tip is about initiating and concluding your screen recording session.
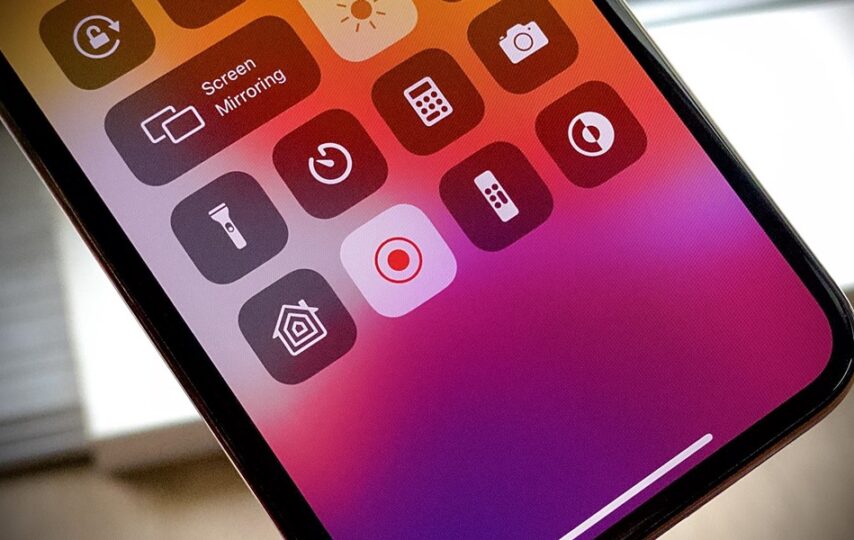
Starting and stopping a screen recording on an iPhone is the foundation of this process. To start, swipe down from the upper-right corner of your screen to access the Control Center, then tap the record button. To stop, tap the red status bar at the top of your screen, and confirm. Remember, the way you start and stop recording can impact the flow of your video.
Tip 2: Utilize Do Not Disturb Mode
This tip helps you avoid interruptions during recording.
Activating ‘Do Not Disturb’ mode on your iPhone before starting a screen recording ensures that notifications don’t pop up mid-recording. This mode is crucial for maintaining the professionalism and focus of your video, especially when creating content for public viewing or professional purposes.
Tip 3: Manage Your Storage Space
Here, we talk about efficiently using your iPhone’s storage for screen recordings.
Screen recordings can quickly eat up your iPhone’s storage, especially if they are long or frequent. Regularly managing your storage by deleting unnecessary files and transferring recordings to other devices or cloud storage can help you avoid running out of space unexpectedly.
Tip 4: Use External Audio Recording
This tip is about enhancing the audio quality of your screen recordings.
For clearer audio in your screen recordings, consider using an external microphone or recording your voiceover separately. This approach improves the overall audio quality, making your recordings more professional and easier to understand, especially in noisy environments.
Tip 5: Edit Your Recordings for Clarity
Finally, this tip focuses on post-recording editing.
Editing your screen recordings can significantly enhance their clarity and effectiveness. Simple edits like trimming the start and end, adding text overlays, or cutting out irrelevant sections can make your recordings more engaging and focused on the key message.
Pros
Let’s explore some benefits of screen recording on an iPhone.
Benefit 1: Easy Sharing of Information
Screen recordings make sharing visual information effortless.
With screen recordings, you can easily share complex processes, visual data, or step-by-step tutorials. This ease of sharing visual content makes communication more efficient, especially in educational and professional contexts.
Benefit 2: Enhancing Learning and Engagement
Screen recordings can significantly boost learning and engagement.
By visually capturing and presenting information, screen recordings cater to visual learners and can make complex topics more accessible. This visual approach can enhance engagement and retention of information, especially in educational settings.
Benefit 3: Documenting Issues for Technical Support
Screen recordings are invaluable for documenting technical issues.
When facing software glitches or technical problems on your iPhone, a screen recording can effectively capture the issue, making it easier for technical support teams to understand and resolve the problem.
Cons
However, there are some limitations and drawbacks to consider.
Drawback 1: Limited Recording Time
Screen recording on an iPhone comes with time limitations.
Due to storage constraints and battery life, you can’t record endlessly. Long recordings can fill up your storage quickly and drain your battery, limiting the length and frequency of your recordings.
Drawback 2: Potential Privacy Concerns
Be mindful of privacy when screen recording.
Screen recording can inadvertently capture sensitive information like passwords or personal messages. Always ensure you’re recording only what is necessary and that you have permission to record any content involving others.
Drawback 3: Impact on Phone Performance
Recording can affect your iPhone’s performance.
Running a screen recording, especially for extended periods, can slow down your phone and affect other functionalities. This is important to consider when planning to record something important.
Additional Information
There are more nuances to explore in the realm of iPhone screen recording.
For instance, you can customize the screen recording settings to include your microphone audio. This feature is especially useful for adding commentary or instructions to your recording. Also, consider the orientation of your device; recording in landscape mode can provide a wider view, which is beneficial for certain types of content like gaming or tutorials.
Another tip is to close unnecessary apps and clear your screen of clutter before recording. This not only frees up processing power but also ensures that your recording is focused and free from distractions.
Moreover, explore third-party apps for more advanced editing and recording options. These apps can offer features like higher video quality, additional editing tools, and more control over your recordings.
Lastly, remember that regular updates to your iPhone’s operating system can bring new features or changes to the screen recording functionality, so it’s good to stay updated.
Summary
- Start and stop recording effectively.
- Use ‘Do Not Disturb’ mode to avoid interruptions.
- Manage storage space efficiently.
- Use external audio for better quality.
- Edit recordings for enhanced clarity.
Frequently Asked Questions
Question 1: Can I record my screen with sound on an iPhone?
Yes, you can record your screen with sound on an iPhone. You can choose to record the device’s internal sounds, use the microphone for external audio, or both.
Question 2: How long can I record my screen on an iPhone?
The length of a screen recording on an iPhone depends on your device’s storage capacity and battery life. There is no set time limit, but longer recordings will consume more storage and battery.
Question 3: Are there any third-party apps recommended for screen recording?
There are several third-party apps available for screen recording on the iPhone, offering various features like advanced editing tools and higher video quality. Some popular options include ScreenFlow, TechSmith Capture, and DU Recorder.
Question 4: Can screen recording capture phone calls or FaceTime calls?
Due to privacy and legal reasons, iPhone’s built-in screen recording feature does not capture audio during phone or FaceTime calls.
Question 5: How can I improve the video quality of my screen recordings?
To improve the video quality of your screen recordings, ensure your device has enough storage and processing power. Additionally, using third-party apps can offer higher quality recording options.
Conclusion
Mastering screen recording on an iPhone opens up a world of possibilities, from creating engaging educational content to documenting important moments and technical issues. By following the tips outlined in this article, you can enhance the quality and effectiveness of your screen recordings. Remember to be mindful of privacy concerns, manage your storage space, and explore editing options to create impactful and clear content. As technology continues to evolve, so do the ways we use it to communicate and share information. Embrace these advancements and make the most of your iPhone’s screen recording capabilities!