
You can start designing shoes tonight for nothing. Blender is free, and roughly 57% of new 3D users begin there. What you cannot do tonight, at any price, is produce a shoe a factory can cut.
That gap is the actual beginner problem, and no software closes it. Most guides to shoe design software skip straight to a tool comparison table, which is why many people spend six weeks learning a program that was never going to do what they had in mind. So this guide starts somewhere else.
Three Jobs Wearing One Name
The term covers three unrelated activities, and choosing between them is the first real decision.
Making pictures of shoes is one job. Illustrator, Photoshop, Affinity, Blender. You end up with concepts, portfolio work, and marketing images. Nothing here produces a manufacturing instruction.
Making shoes is a different job. This is footwear-specialized CAD: Icad Universe, Shoemaster, Romans CAD, with Rhino and CLO3D doing adjacent work on soles and textile uppers. These build geometry on a last, flatten it into cutting patterns, size it across a run, and output a technical package.
Selling configurable shoes is the third job, and it starts only after a shoe exists. A shopper picks a colorway on a finished model in a browser. No geometry is created.
So the useful question isn’t which software is best. It’s what you need to come out the other end. A portfolio image, a pattern a factory can cut, or a product page a customer can configure. Those three answers point at three different toolchains, and mixing them up costs more time than picking the “wrong” tool inside the right category ever will.
The Last Is the Part Nobody Warns You About
Here’s what surprises people arriving from graphic design.
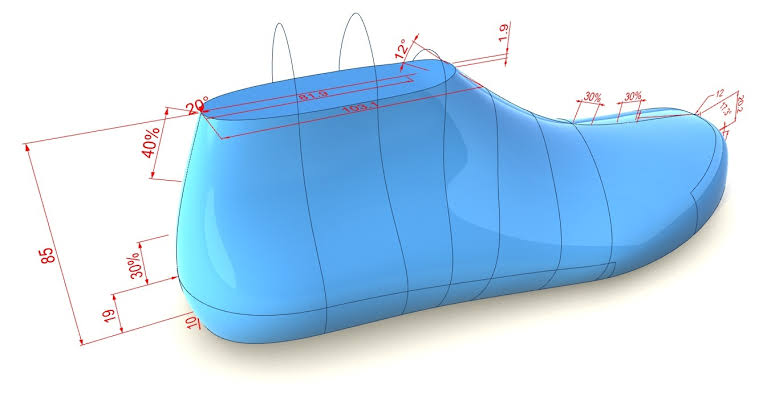
A shoe isn’t drawn in open space. It’s drawn on a last, the foot-shaped form the shoe is built around, which fixes the fit, the volume, and the toe shape before a single style line exists. Romans CAD describes its own workflow as creating a 3D model based on a last, then drawing style lines onto it, then flattening the result into 2D patterns for grading. Every serious package works in that order.
Which means the last, not the software, is your first dependency. You need a digital one, either scanned from a physical last or pulled from a library, and it has to correspond to a real last a factory can actually put on a machine. Beginners routinely download some generic foot mesh, spend a week drawing beautiful lines on it, and then find out the geometry corresponds to nothing anybody manufactures.
No amount of software shopping fixes that. It’s a sourcing problem wearing a technical disguise.
The Vocabulary Comes Before the Software
Open any footwear CAD program, and the interface will ask you about things you may not have names for yet. Vamp. Quarter. Counter. Toe puff. Topline. Lasting allowance. Grain direction.
These aren’t jargon for its own sake. They’re the parts of a shoe and the physical constraints on assembling them, and the software is organized around them because the factory is. Pattern making and last design is a subject with textbooks and multi-week courses behind it, and it existed for a century before any of this was digital.
The practical consequence for a beginner: two or three days spent learning shoe anatomy will save you more time than two or three weeks of tutorials in any program. That ordering feels backwards when you’ve paid for software and want to open it. Do it anyway.
What This Actually Costs in 2026
Prices vary more by category than by brand.
Visualization is close to free. Blender costs nothing. Substance-style material tools run on modest subscriptions. If your goal is concepts and renders, your spend is time.
Generalist 3D sits in the middle. A commercial Rhino license is US$995, permanent, with no maintenance fee, and students pay $195 for the owner software. It’s the common choice for sole and heel engineering, and for a beginner, it’s the only paid tier that behaves like a normal purchase.
Footwear-specialized shoe design software is quote-only. ICAD Universe, Shoemaster, and Romans CAD sell to companies rather than individuals, usually with training attached, and the pricing conversation assumes you have a production context. If you’re a student or a solo designer, this tier is generally not open to you yet, and pretending otherwise wastes a lot of email.
Customer-facing configuration is a commerce cost, not a design one. You’re paying for a storefront capability, and the input it needs is a finished 3D model rather than a license to make one.
Your First Project Should Not Be a Shoe
Now, the advice most beginner guides won’t give you.
Designing a shoe from scratch is the wrong first project. Take an existing 3D shoe model, one you didn’t build, and change it. Swap the materials. Rework the colorway. Light it properly and render it in three different ways. Then do it again with a different silhouette.
This sounds like a lesser task. It isn’t, for two reasons.
The first is that material and lighting are where renders actually succeed or fail, and they’re separable from geometry, so you can get genuinely good at them without knowing pattern engineering. Modern tools describe materials physically rather than visually, carrying roughness, reflectivity, and surface detail rather than just a color, and learning to judge that is a skill you’ll use forever.
The second reason is less obvious. Re-materialing an existing model isn’t a beginner exercise at all. It’s a commercial product category. Every brand customization program you’ve used, where you pick your own colorway on a running shoe, is exactly this operation, performed by a shopper instead of a designer. The model gets optimized for the browser, usually exported as GLB, and an administrator maps options to material changes on specific pattern pieces. That’s the work we do at PrintXpand with our 3D shoe configurator, and the honest framing is that it’s a commerce tool wearing 3D clothes. It’s measured on load time and conversion, not on engineering fidelity.
So the exercise teaches you a marketable skill and, if it turns out you enjoy that half more than the pattern half, it’s an entire career you didn’t know was there.
Where Beginners Get Stuck
Three specific misunderstandings account for most of the wasted months.
Grading is not scaling. Sizing a design across a run isn’t multiplying the pattern by a constant. Feet don’t change proportionally between a 38 and a 45, so grading follows rules that the specialized software encodes and general 3D tools simply don’t have.
A render can’t test a shoe. It can tell a merchandiser whether a colorway sells and a buyer whether to commit. It cannot tell anyone whether the collar rubs at hour two. Digital work replaces the samples that existed to be looked at. It doesn’t replace the ones that exist to be worn, and any vendor implying otherwise is selling.
Free tools stop at a specific wall, not a general one. Blender will take you a long way. It will not flatten an upper into a production pattern with lasting allowances, because that’s not a modeling operation; it’s a footwear engineering one. This is the single most useful thing to understand about shoe design software pricing: what you’re paying for at the top tier isn’t a better interface; it’s construction logic.
A Realistic First Ninety Days
If you’re starting now, here’s a sequence that works.
Weeks one and two: shoe anatomy and construction, on paper. Learn the parts and how they’re assembled. No software.
Weeks three through six: one 3D tool, learned on existing models. Recolor, re-material, light, render. Build five pieces you’d show someone.
Weeks seven through twelve: pick your direction and commit. If it’s development, this is where you find training on footwear-specific shoe design software and get access to a real last. If it’s commerce, this is where you learn model optimization and how a configurator consumes what you build.
Worth being blunt about the payoff, since beginner guides tend to inflate it. Around 40% of physical samples never advance to production, and cutting that waste is a real prize that digital work genuinely earns. It also takes longer to get there than a tutorial playlist suggests. The software is the cheap part of this. Everything worth learning sits underneath it.
About the author
Pratik Shah leads the creative vision at PrintXpand, a product personalization and print automation platform serving 350+ businesses across 40+ countries. He works with footwear and apparel brands, decorators, and manufacturers on 3D configuration, personalization, and production workflows. Learn more at printxpand.com.